

Think of guitar tabs as a cheat code for your fretboard. Instead of deciphering complex musical notation, you get a simple, visual map that tells you exactly which string to play and which fret to press. A ‘0’ means play the string open; a ‘5’ means press the fifth fret. It’s a direct, intuitive system that gets you playing your favorite songs almost immediately.
What Is Guitar Tablature
Guitar tablature, or just “tab” for short, cuts straight to the chase. It’s a beautifully simple notation system designed specifically for fretted instruments. Forget about learning to read traditional sheet music right away; tab gives you a practical, hands-on way to start making music now. It’s designed to tell you two things: where to put your fingers and which strings to pluck. This makes it an absolute game-changer for beginners.

And don’t mistake its simplicity for a modern invention. This system has some serious history, with roots stretching all the way back to the 15th and 16th centuries for instruments like the vihuela. The fact that it’s been around for centuries just proves how effective it is as a practical tool for players. You can actually find out more about the history of guitar tablature on TabTutorial.com.
The Six Lines and What They Mean
When you pull up a guitar tab, the first thing you’ll see is a staff of six horizontal lines. This is the core of the whole system. Each line represents one of your guitar’s six strings. The trick is to visualize the tab as if you’re holding your guitar on your lap and looking down at the fretboard.
- The bottom line of the tab is your thickest, lowest-pitched string (the low E string).
- The top line represents your thinnest, highest-pitched string (the high e string).
A Quick Tip from a Teacher: This is hands-down the most common trip-up for new players. Just remember that the tab is oriented by pitch, not physical position when you’re standing. Top line = high pitch. Bottom line = low pitch. It’ll click in no time.
Numbers on the Strings
Now for the fun part. The numbers placed on those lines tell you which fret to press down on that specific string. It’s a simple coordinate system: the line tells you the string, and the number tells you the fret.
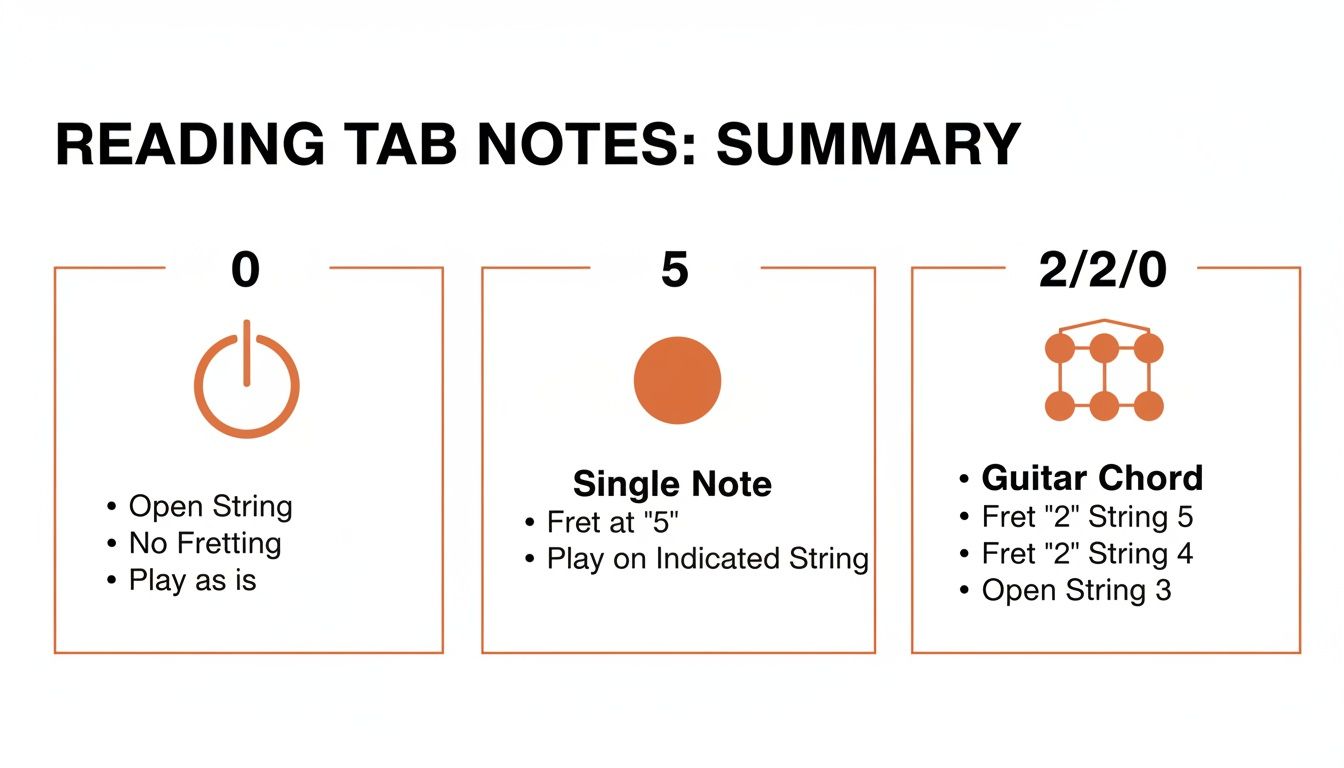
- A 0 means you play that string “open”—no fretting required.
- A 5 on the bottom line means you’ll press the 5th fret on your thickest string (low E).
- A 3 on the second line from the top means you’ll press the 3rd fret on your B string.
That’s really all there is to it. This combination of lines and numbers is the key to unlocking thousands of songs. It’s an efficient system that closes the gap between seeing music on a page and actually playing it on your guitar.
As a music educator, I’ve seen this system work wonders for countless students. To see it in action and get some hands-on practice, I highly recommend checking out the guided lessons available with a TrueFire All Access Trial.
Guitar Tablature Basics at a Glance
If you’re ever feeling lost, just come back to this table. It’s your go-to reference for the core components you’ll find in any standard guitar tab.
| Tab Element | What It Represents | How to Read It |
|---|---|---|
| 6 Horizontal Lines | The 6 strings of the guitar | Top line is the high e (thinnest); bottom is the low E (thickest). |
| Numbers (e.g., 3, 5, 12) | The fret number to press | A ‘3’ means press the 3rd fret; a ’12’ means press the 12th. |
| 0 | An open string | Play the string without fretting any note with your left hand. |
| Vertical Numbers | A chord or notes played together | Press all fret numbers shown in the vertical line at the same time. |
| Horizontal Sequence | The order of notes in a riff or melody | Read the numbers from left to right, just like reading a sentence. |
Think of this table as your pocket dictionary for reading tabs. Once these fundamentals are locked in, you’ll be ready to tackle any riff or chord progression that comes your way.
Translating Numbers into Notes and Chords
Alright, you’ve got the lay of the land—you know which line is which string and what the numbers mean. Now for the fun part: making actual music. The real magic of guitar tab is how it cuts right to the chase, telling your fingers exactly where to go.
Think of it this way: a single number on a single line is one note. When you see a few of them in a row, you’re looking at a melody or a riff. You just read them from left to right, like words in a sentence.
For example, if a tab shows 3-5-7 on the A string (that’s the second line from the bottom), you simply play the 3rd fret, then the 5th fret, and finally the 7th fret, one right after the other. It’s the most straightforward way to start playing iconic lead lines and bass runs, and it’s fantastic for building that crucial connection between what you see and what your fingers do.
From Single Notes to Chords
But what about when the numbers are stacked on top of each other? That’s your cue that you’re looking at a chord—multiple notes played all at once. To play it, you’ll need to press down all the frets shown in that vertical stack at the same time and strum the correct strings.
Let’s use a good old G major chord as our test subject. In tab, it looks like this:
B|-0-|
G|-0-|
D|-0-|
A|-2-|
E|-3-|
This stack is a set of instructions: press the 3rd fret on the low E string, the 2nd fret on the A string, and the 3rd fret on the high e string. The other strings—D, G, and B—have a ‘0’, which means you play them open (without fretting any note). Strum them all together, and you’ve got that classic, full-bodied G chord. Getting used to spotting these vertical stacks is your ticket to playing rhythm guitar.
As a guitar instructor, I always tell my students that seeing these chord shapes on paper is the first step. The real goal is to get your hand to recognize the shape instinctively, so you’re not thinking “3-2-0-0-0-3” but simply “G chord.”
Seeing the Patterns in Scales
Tabs are also an incredible tool for visualizing scales. A scale is just a specific sequence of notes, the raw material for solos and melodies. When you see a scale laid out in tab, you can physically see the pattern your fingers will make on the neck. This is huge for improvisation and songwriting.
For instance, here’s one way to play a C major scale, starting on the A string:
Reading this lets you trace the pattern right up the fretboard, which helps build muscle memory way faster than trying to read it on a traditional staff. By practicing single-note lines, chord shapes, and scale patterns, you slowly train your brain to stop translating and start playing. You’ll see the numbers, and your fingers will just know where to go.
Adding Expression with Technique Symbols
Playing the right notes gets you in the ballpark, but the real magic in guitar playing happens in how you play them. We’re talking about the bends, slides, hammer-ons, and other little nuances that make a riff truly sing. Guitar tabs use a special set of symbols to capture all that mojo, turning a dry sequence of numbers into real, expressive music.
Learning these symbols is like learning punctuation. Sure, you can write a sentence without commas or periods, but it won’t have any feeling or flow. These techniques are what let you tell a story with your guitar.
Before diving into the fancy stuff, make sure you’ve got the fundamentals down. This graphic is a great recap of the building blocks—open strings, fretted notes, and basic chords—that we’ll be adding all this expression to.
Once you’re comfortable with placing your fingers and picking the notes, you’re ready to start making them sound awesome.
Hammer-Ons, Pull-Offs, and Smooth Legato Lines
The term legato is just a fancy way of saying you’re playing notes smoothly and connectedly. On guitar, we primarily achieve this with two killer techniques: hammer-ons and pull-offs. They’re the secret to playing fast, fluid-sounding lines without picking every single note.
- Hammer-Ons (h): You’ll see this as an ‘h’ between two fret numbers, like
5h7. You start by picking the first note (the 5th fret). While that note is still ringing, you forcefully bring down—or “hammer”—another finger onto the 7th fret of the same string. The impact itself is what sounds the second note. No second pick needed. - Pull-Offs (p): This is the exact opposite, written like
7p5. You’ll start with fingers on both frets (7 and 5). Pick the string once, then as the 7th-fret note rings, you pull that finger off with a slight downward plucking motion. This action makes the note underneath it (on the 5th fret) sound out.
Getting these two techniques down is what gives so many rock and blues solos that buttery-smooth feel. It’s all about finger strength and precision.
Giving Notes a Voice with Bends and Slides
If you really want to make your guitar cry or scream, you need to master bends and slides. These are fundamental to just about every style of electric guitar, manipulating a note’s pitch to give it a vocal-like quality.
A string bend, usually marked with a ‘b’ or sometimes an arrow, is exactly what it sounds like. For a tab like 7b9, you’d fret the 7th fret, pick the note, and then physically push the string across the fretboard until its pitch matches the sound of the 9th fret. This is the sound of pure rock and roll.
A slide is your ticket to moving between notes seamlessly. You’ll see it marked with a slash (/ for an upward slide or \ for a downward one). If the tab says 7/9, you pick the note at the 7th fret and, without lifting your finger, slide it straight up to the 9th fret. It’s a staple sound in everything from gritty blues licks to soaring metal leads.
Pro Tip: When I’m teaching bends, I tell my students to use their ears more than their muscles. It’s not just a random push; you’re aiming for a specific target pitch. Try humming the sound of the target note first, then bend the string until you match it.
Texture and Attitude: Vibrato and Palm Muting
Now for the finishing touches. Vibrato and palm muting are all about adding texture and controlling a note’s character, giving you another layer of dynamic control.
Vibrato, shown with a ~ symbol, adds a beautiful, shimmering quality to held notes. After you fret a note, you create this effect by making tiny, rapid bends with a rocking motion of your wrist. It’s what gives a note life and lets it sustain with emotion.
Palm muting is the key to tight, chunky, percussive rhythm sounds. You’ll see it marked as P.M. over a section of tab. You just lightly rest the fleshy side of your picking hand on the strings, right where they come over the bridge. When you pick, the notes are dampened, giving you that classic, aggressive chugging sound essential for rock and metal.
To help you get a handle on all these expressive tools, here’s a quick-reference table of the most common symbols you’ll encounter in guitar tabs.
Common Guitar Tab Technique Symbols
| Symbol | Technique Name | How to Execute |
|---|---|---|
h | Hammer-On | Pick the first note, then tap your finger onto the second, higher fret on the same string. |
p | Pull-Off | Fret both notes, pick the higher one, then pull your finger off to sound the lower note. |
b | Bend | Fret the note, pick it, then push the string up to raise its pitch to a target note. |
/ or \ | Slide | Pick the first note, then slide your finger up or down the string to the second note. |
~ | Vibrato | Rapidly bend and release the string with your fretting hand to create a wavering pitch. |
P.M. | Palm Mute | Rest the palm of your picking hand on the strings near the bridge to create a muted, percussive sound. |
x | Muted String | Lightly touch the string with your fretting hand so it makes a “thud” instead of a note. |
NH or < > | Natural Harmonic | Lightly touch the string directly over a fret wire (e.g., 5th, 7th, 12th) and pick it. |
Of course, reading about these techniques is one thing, but seeing and hearing them in action is the fastest way to learn. Interactive tools are a game-changer here. A TrueFire All Access Trial gives you synced video and tab, so you can watch an instructor play a lick, see the notation light up in real-time, and loop any section you need to nail.
Finding the Rhythm in Guitar Tabs
Alright, so you’ve got the notes and techniques down, but what about the pulse that holds it all together? Figuring out the timing is often the biggest hurdle when you’re learning to read guitar tabs. This is especially true with the thousands of basic, free tabs online that offer zero rhythmic information. You’re left guessing, and a song you know by heart can quickly turn into a jumbled mess of notes.
The most powerful tool you have for cracking this code is right on the side of your head: your ears. Listening to the song you’re learning isn’t just a good idea—it’s absolutely essential. No tab, no matter how detailed, can ever replace the groove and swing of the actual recording. Think of the tab as your road map, but let the song itself be your guide.
This simple, visual approach to music is exactly what made tablature so popular in the first place. Guitar tabs really took off in the 20th century, fueling the explosion of self-taught players across the globe. Unlike sheet music, tabs let beginners jump right in and learn songs by showing them exactly where to put their fingers, skipping a lot of the heavy music theory. That trend went into overdrive with the internet in the late 1990s and 2000s, as websites began hosting countless tabs and democratizing guitar learning even further. You can get more of the backstory on the history of self-taught guitarists on YouTube.
Decoding Rhythm from Spacing
Even the most bare-bones tabs give you some subtle clues about the rhythm. The key is to look at the horizontal spacing between the numbers.
- Numbers bunched close together almost always mean quicker notes.
- Numbers with a wider gap between them usually suggest longer, sustained notes.
It’s not a perfect system, but it gives you a ballpark idea of the phrasing. It helps you spot the fast runs versus the moments where you need to let a note ring out.
When Tabs Get Serious About Rhythm
When you need dead-on accuracy, you’ll want to find higher-quality tabs that blend standard rhythm notation with the tablature staff. These hybrid tabs are a total game-changer. You’ll see the familiar tab lines, but right above them, you’ll find the stems, flags, and beams used in traditional sheet music.
As an instructor, I always push my intermediate students toward this type of notation. It’s the bridge between the simplicity of tab and the rhythmic precision of sheet music, giving you the best of both worlds.
Learning to recognize these symbols is a huge leap forward in your playing. You’re no longer guessing if a note is short and punchy or long and flowing; the notation tells you exactly what to do. This is the secret to nailing complex solos or intricate rhythm parts with perfect timing.
Getting comfortable with this takes some practice, but the payoff is massive. Interactive tools can really speed up the learning curve. When you’re ready to take that next step, a TrueFire All Access Trial gives you thousands of lessons with synced tab and notation, letting you see and hear the rhythm in real-time.
Practical Exercises and Fixing Common Mistakes
Theory is great, but it’ll only take you so far. Real fluency with guitar tabs comes from one thing: practice. Getting your hands on the fretboard and actually playing is how you forge that all-important connection between your brain and your fingers. It’s the only way those numbers on the page start to feel like real music.
A fantastic starting point is playing simple melodies on a single string. Just pick one—let’s say the high e-string—and work through a basic scale like 0-2-3-5-7-8-10-12, playing it up and then back down. Speed isn’t the goal here; accuracy is. Concentrate on reading one number, picking that note cleanly, and then moving on. This simple drill sharpens your reading and locks in that left-to-right flow.
Tackling Common Sticking Points
After years of teaching, I’ve seen the same handful of mistakes trip up new players again and again. Spotting these hurdles early is the secret to moving past them quickly and avoiding pesky bad habits. Trust me, if these sound familiar, you’re in good company—every guitarist has been there.
The number one culprit? Reading the strings upside down. It’s a classic. Always remember: the bottom line of the tab is your thickest, lowest-pitched string (low E), and the top line is your thinnest, highest-pitched string (high e). It feels backward at first, but it’s designed to mirror how you look down at your own fretboard.
One of my favorite teaching tricks is to have students physically point to the correct string on their guitar for each note in the tab before they even try to play it. This simple check reinforces the correct orientation until it becomes second nature.
Another common roadblock is fumbling the timing on techniques. A pull-off, for instance, isn’t just about lifting your finger off the string. It needs a slight “plucking” motion with that fretting finger to make the next note ring out clearly. The best fix is to isolate the technique and practice it super slowly until the motion feels smooth and sounds clean every time.
Building Your Skills with Practical Riffs
Once you’ve got a handle on single-string exercises, it’s time to start jumping between strings. This is where your reading skills really get put to the test. Find some tabs for simple, recognizable riffs that only use two or three adjacent strings to start.
As you practice, keep these three things in mind:
- Accuracy: Are you hitting the right fret on the right string, every single time?
- Rhythm: Are you listening to the actual song to nail the timing and feel of the notes?
- Clarity: Are your notes ringing out clearly, without any annoying buzzes or muted strings?
Applying what you’re learning to real music is, without a doubt, the most effective way to improve. Building confidence is a slow burn. It’s all about finding your weak spots and hitting them with focused, intentional practice. Before you know it, you’ll be reading tabs without a second thought. And if you want to speed things up with guided exercises and interactive lessons, a TrueFire All Access Trial can be a game-changer.
Accelerate Your Learning with Modern Tools
In my years of teaching, I’ve seen firsthand how the right technology can completely change the game. It can take the learning process from slow and frustrating to fast and, dare I say, fun. While finding static text tabs on a website is a decent starting point, modern interactive tools are a massive upgrade for anyone serious about getting better.
These interactive platforms really bring tablature to life. Picture this: the tab automatically scrolls in real-time as you watch a video of the instructor playing the exact same part. That synchronized feedback loop is incredibly powerful. It closes the gap between just seeing the numbers on a screen and truly hearing—and understanding—how they should sound.
Smarter Practice Features
The best tools are packed with features designed to solve the exact problems we all face in the practice room. You can slow down a ridiculously fast solo to a speed where you can actually process it, and it does so without that annoying, high-pitched “chipmunk” sound.
Then, once you’ve pinpointed that one tricky two-measure phrase that’s tripping you up, you can loop it. Over and over. You just let it run until the muscle memory kicks in and you can nail it without even thinking.
As an educator, I can’t overstate how valuable this is. It turns passive reading into active, focused practice, which is the absolute fastest way to build real skill and confidence on the instrument.
These features make the whole process of learning to read guitar tabs so much more efficient. You can learn more about how TrueFire’s online lessons use Soundslice technology to create this kind of interactive experience. This approach helps you develop your ear and your musicality, not just your ability to follow a set of instructions.
If you want to see how these tools can seriously fast-track your progress, I highly recommend trying them yourself with a TrueFire All Access Trial.
Got Questions About Reading Tabs? You’re Not Alone.
Even with the best guide in front of you, a few questions always seem to pop up when you’re first getting the hang of reading guitar tabs. I’ve heard them all from my students over the years, so let’s clear up some of the most common ones and get you back to the fun part—actually playing.
What Does the ‘X’ Mean on a Guitar Tab?
When you see an ‘x’ on a tab line, it’s telling you to play a muted string, sometimes called a “dead note.”
You pull this off by lightly touching the string with your fretting hand—just enough to stop it from ringing out, but not hard enough to actually fret a note. When you strum, you get this cool, percussive ‘click’ instead of a musical pitch. It’s a hugely important technique you’ll find all over funk, rock, and tons of acoustic strumming patterns where the rhythm is king.
How Do I Read Tabs in Alternate Tunings?
This one’s easier than you think. Any decent tab will tell you the tuning right at the top, before any of the music starts. For instance, you might see “Tuning: D-A-D-G-B-E” for Drop D, or something else entirely.
The great news? The way you read the tab itself doesn’t change one bit. The lines are still the strings, and the numbers are still the frets. All you have to do is re-tune your guitar to match the instructions before you start playing, and you’ll be golden.
Can I Actually Learn Guitar Just from Tabs?
One hundred percent. Millions of guitar players, including a ton of pros I know, got their start and learned their favorite songs exclusively using tabs. It’s a ridiculously effective, direct path to making music without getting bogged down in the complexities of standard notation right away.
That said, as an educator, I’ll give you a little pro-tip: try to supplement your tab-reading with a bit of ear training. Even just picking out simple melodies by ear will make you a far more well-rounded musician in the long run. But for just getting started and building up a solid library of songs? Tabs are your absolute best friend.
Ready to stop guessing and start playing with real confidence? The interactive tab and video lessons at TrueFire sync up perfectly, showing you exactly how every note should sound and feel. Kickstart your journey with a TrueFire All Access Trial.